Dreaming of warm, gooey chocolate lava cake? I have the best news.
A Duo Delight: Why This Chocolate Lava Cake Recipe Shines
I love sharing good food. This recipe is a true joy. It makes a rich, warm treat. You get a gooey chocolate center. This easy chocolate lava cake recipe is my best. We give simple steps. You can make this cake two ways. Both ways give a warm, soft core.
Experience the Ease of Two Cooking Methods
You choose your cooking path. Make this treat in an Instant Pot. Or bake it in your oven. Both ways are simple. Both are quick. This gives you great choice. The Instant Pot cooks this lava cake fast. It uses steam. The oven gives a crisp top. This recipe helps you pick what is best. It works for a quick dessert. This is beginner friendly baking. We show how to make lava cake.
Achieve Decadent Results with Minimal Effort
This recipe needs few steps. You will get great taste. It is an impressive dessert easy to make. This speedy chocolate treat tastes rich. You do not need much prep time. The cook time is short
Gathering Your Simple Ingredients for a Decadent Treat
Essential Pantry Staples Youll Need
You need simple items for your easy chocolate lava cake recipe. I use butter for lava cake. You also need sugar for lava cake. Eggs for lava cake make it rich. A bit of flour for lava cake adds body. Vanilla extract in lava cake gives a warm taste. These simple dessert ingredients are key. They build a great lava cake.
Choosing the Right Chocolate for the Best Flavor (Full Recipe)
Good chocolate makes a big taste. Pick dark chocolate lava cake for best results. It gives a rich chocolate flavor dessert. A high-cocoa bar works well. You can use cocoa powder lava cake too. It adds deep color and taste. This is part of the Full Recipe for great flavor.
Preparing Your Ramekins for Success
Ramekins for lava cake must be ready. Grease each dish well. Use soft butter for this step. Dust them with cocoa powder. Or use a bit of flour. This helps your cake slide out. It stops the cake from sticking. This step makes a neat serve.
How to Bake Perfect Chocolate Lava Cakes in Your Oven
Step-by-Step Batter Making
You can make a great oven baked lava cake. First, mix your lava cake batter. Use a big bowl for this. Stir wet and dry parts. Do not stir a lot. Over mixing makes cakes tough. Next, get your ramekins ready. Grease them with soft butter. Dust with cocoa powder. This helps cakes slip out. Fill each ramekin now. Do not fill them to the top. Leave space for cakes to rise. This helps with unmolding lava cake. Your batter is ready.
Setting the Right Oven Temperature and Baking Time
Set your oven for classic chocolate dessert. A hot oven works best. This helps cake edges cook fast. It keeps the middle soft. Oven temperature for lava cake matters. Get it right. The baking time for lava cake also counts. It changes for each oven. Watch your cakes. Edges should be firm. The center must still be soft. This makes a molten chocolate cake recipe. This part is key for a good oven baking dessert. Find the Full Recipe for exact details.
Knowing When Your Lava Cakes Are Ready
How to make lava cake calls for good time sense. Watch the cakes as they bake. The sides will look set. The top will puff up. It may jiggle in the middle. This is a good sign for traditional lava cake baking. Take them out of the oven. Let them rest a few mins. This helps them set more. If you bake too long, the middle cooks. Then your lava cake isnt molten. Tips for perfect lava cake include this step. A soft center is the goal. This gives you a gooey chocolate center dessert. You will love this easy chocolate lava cake recipe.
Mastering Chocolate Lava Cakes with Your Instant Pot
Preparing Your Instant Pot for Baking
I find my instant pot makes a quick lava cake recipe. First, get your ramekins ready. Lightly oil each ramekin. This helps stop cakes from sticking. Next, pour your rich chocolate batter into each one. Fill them about two-thirds full. Do not fill them to the very top. This is a key instant pot baking tip.
I use foil covers for ramekins. Cover each ramekin with a piece of foil. This keeps wet steam out. It helps make a perfect instant pot lava cake. Now, add water to your instant pot. About one cup of water works well. This water bath instant pot baking is key. It helps cook cakes gently.
Place a trivet inside the pot. Set your foil-covered ramekins on the trivet. You can stack them if you need to. Just make sure they are steady. This setup ensures even cooking. It is a simple lava cake instruction.
Pressure Cooking for a Flawless Molten Center
Close your instant pot lid. Set the vent to seal. Now, it is time for pressure cooking desserts. Cook on high pressure for a few short minutes. This lava cake cooking time is quick. We want a gooey chocolate center dessert. It makes the best lava cake recipe.
The pressure cooker chocolate cake cooks fast. It gives a warm chocolate dessert with ease. This instant pot dessert recipe is a true joy. It is a simple way how to make lava cake. The high heat seals in the good taste. It is an easy chocolate lava cake recipe.
After cooking, let the pressure release. Do a natural release for five minutes. Then, do a quick release. This instant pot release method lava cake is important. It helps the cakes set just right. This is a good tip for perfect lava cake.
Safe Removal and Resting Your Cakes
Open the pot lid with care. Use oven mitts to lift the hot ramekins. Place them on a wire rack. Let them cool for a few minutes. This resting helps the cakes firm up. It keeps them from breaking apart.
To unmold lava cake, run a thin knife around the edge. Place a plate on top of the ramekin. Flip it over quickly. The cake should slide out easily. If not, tap the bottom gently. This prevents sticky lava cake. Now you have individual chocolate desserts.
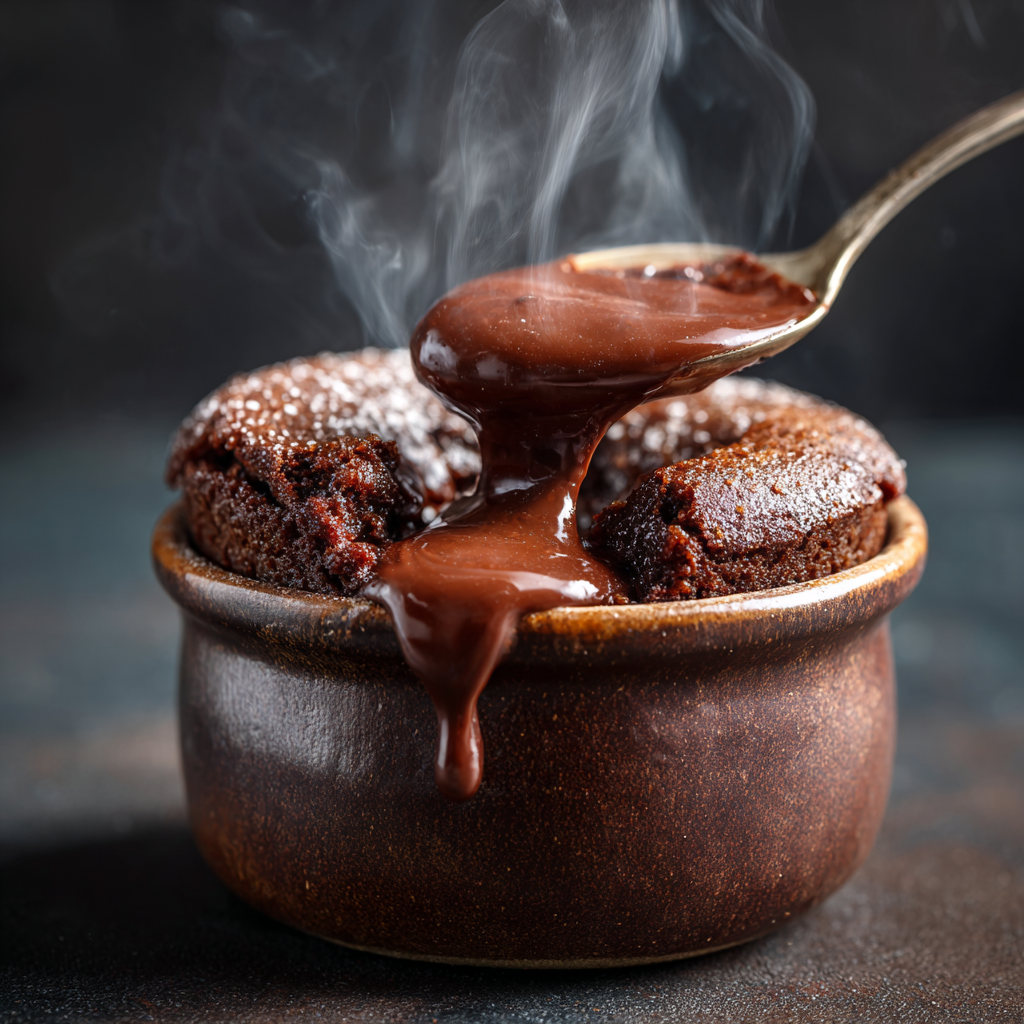
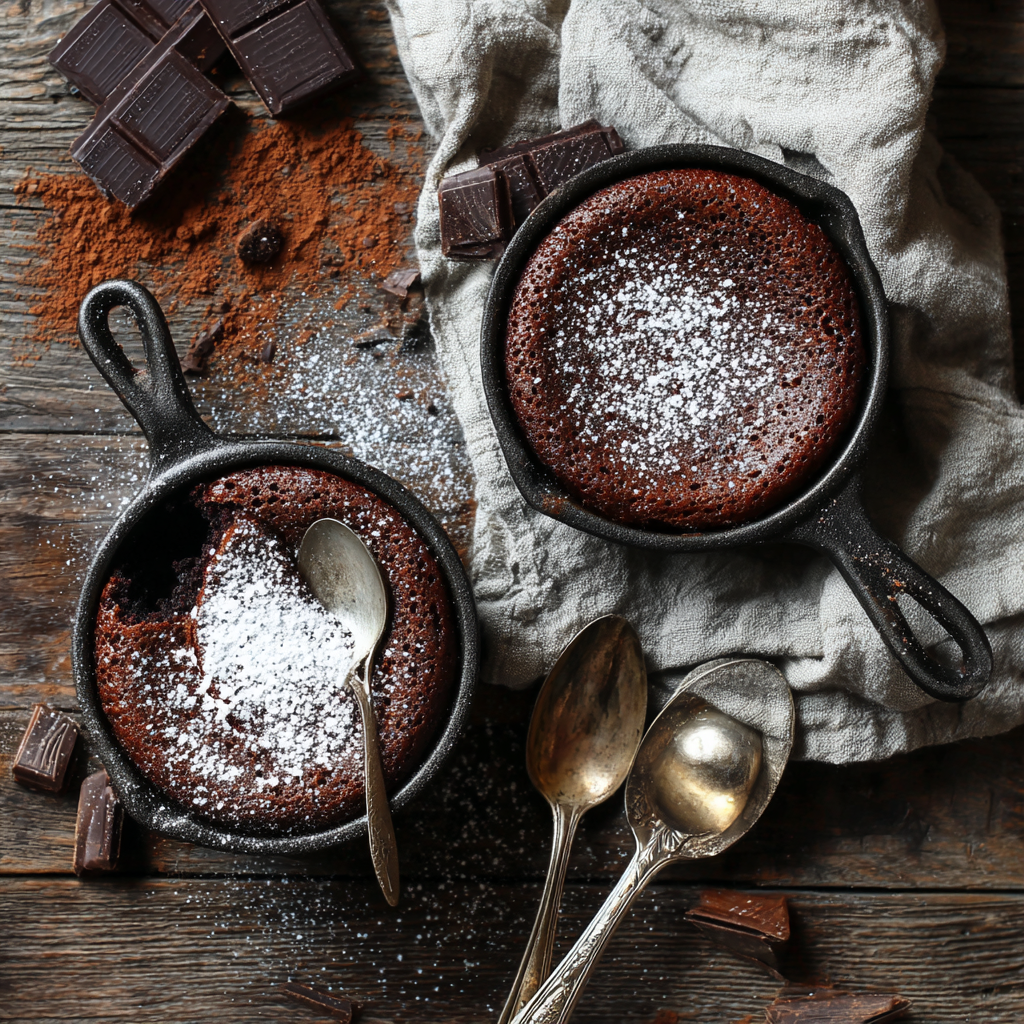
Serve your molten chocolate cake recipe warm. A simple dusting of sugar is nice. This decadent chocolate cake is ready for you. Enjoy your homemade lava cake. It is a speedy chocolate dessert for all. This is a great chocolate dessert for beginners.
Achieving the Perfect Molten Center and Elegant Presentation
Common Mistakes to Avoid for a Gooey Core
You want a gooey chocolate center. This is key for lava cake. If you bake it too long, it bakes through. The cake turns firm. It will not flow. Watch cook time closely. Each oven is a bit new. So check often. A slight jiggle in the middle is good. This means a liquid chocolate core. Do not overmix the batter. Overmixing adds air. This makes a dry cake. It loses its creamy chocolate center. For tips for perfect lava cake, use a light hand. Mix just to blend. This helps prevent sticky lava cake. If your cake isnt molten, you baked it too long. Your gooey chocolate center dessert needs less cook time. Try a shorter time next. This helps with troubleshooting molten center issues. Aim for that rich, creamy chocolate center. It makes a great gooey chocolate center dessert.
When to Unmold Your Lava Cakes
Serve lava cake warm. This is best. Let cakes cool a bit. Five minutes is a good rule. They are hot from the oven. Run a small knife around the edge. Do this gently. Place a plate upside down on top. Flip the cake and plate quickly. The cake will release. If it sticks, try again. A quick flip helps it drop. This is how to serve warm dessert. It shows off the gooey chocolate center dessert. Proper serving lava cake makes a difference.
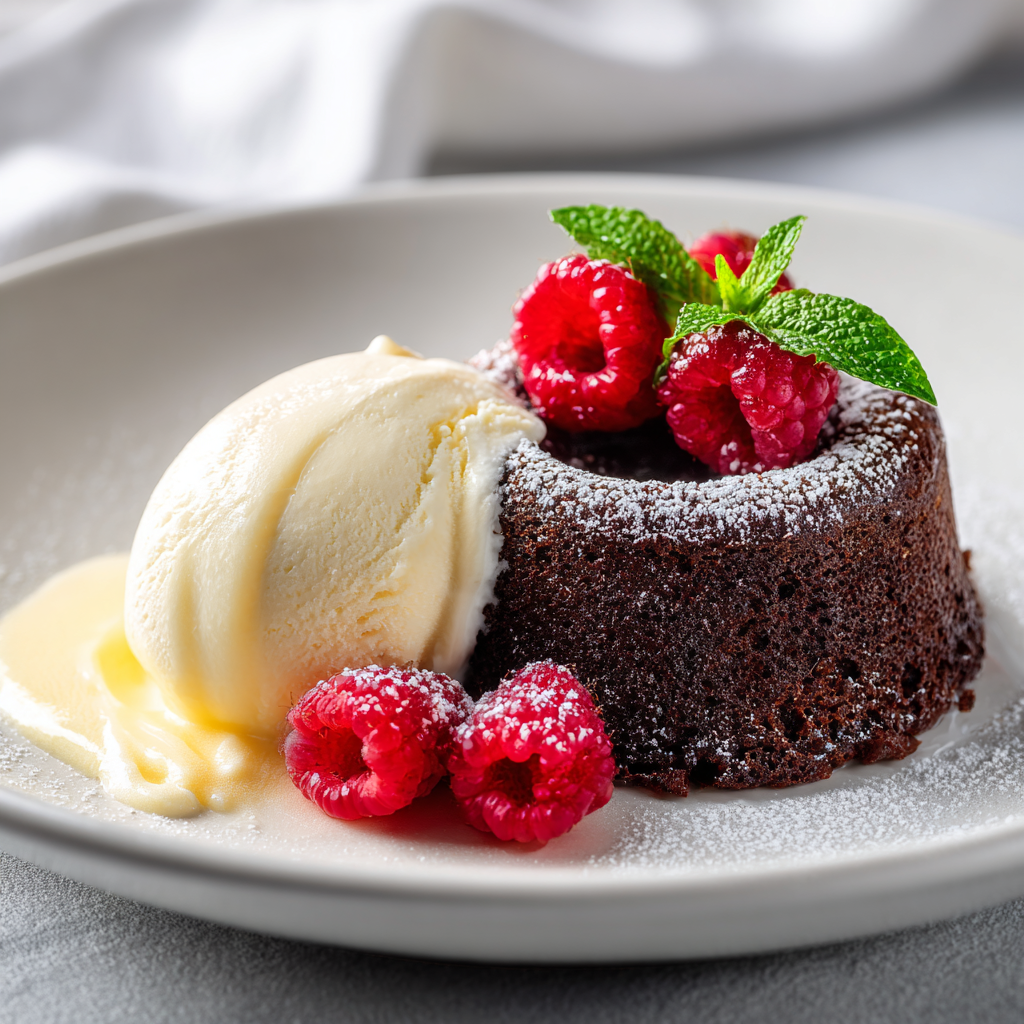
Elevating Your Dessert with Toppings and Pairings
Make your cake shine. Add simple toppings. A scoop of ice cream is great. Vanilla bean ice cream is a top choice. The cold ice
Your Questions Answered: Making This Dessert Your Own
Customize Your Sweet Treat
You can make this easy chocolate lava cake recipe your own. Try new chocolate dessert variations. Add a pinch of sea salt for a deep taste. A bit of espresso powder makes the chocolate pop. These small changes give a rich chocolate flavor dessert.
For a gluten-free lava cake option, swap flour. Use a good gluten-free flour blend. This keeps the soft cake texture. A dairy-free lava cake option is also simple. Use plant-based butter. Pick a dark chocolate that has no milk.
Ensure a Perfect Molten Core
Many ask how to get that gooey chocolate center dessert. The key is not to overbake. A quick lava cake recipe means short cook times. Watch your oven baked lava cake with care. Or check your instant pot lava cake. A soft outer cake and a liquid chocolate core are your goal. If your lava cake isnt molten, you baked it too long. Next time, cut your cook time a bit.
Serving Your
Ingredients
- 4 oz (113g) good quality dark chocolate (60-70% cacao), chopped
- 1/2 cup (113g) unsalted butter, cut into pieces
- 2 large eggs
- 2 large egg yolks
- 1/4 cup (50g) granulated sugar
- 1 teaspoon vanilla extract
- 2 tablespoons (16g) all-purpose flour
- 1/8 teaspoon salt
- Butter, for greasing ramekins
- Unsweetened cocoa powder or flour, for dusting ramekins
Instructions
- Prepare Ramekins: Generously grease four 6-oz ramekins with butter. Dust them thoroughly with unsweetened cocoa powder or flour, tapping out any excess. Set aside.
- Melt Chocolate and Butter: In a microwave-safe bowl or a double boiler, combine the chopped dark chocolate and unsalted butter. Melt in 30-second intervals in the microwave, stirring until smooth, or melt over simmering water, stirring constantly. Let the mixture cool slightly for about 5 minutes.
- Whisk Eggs and Sugar: In a separate medium bowl, whisk together the large eggs, egg yolks, granulated sugar, vanilla extract, and salt until the mixture is light, frothy, and pale yellow, about 1-2 minutes.
- Combine Mixtures: Slowly pour the slightly cooled melted chocolate and butter mixture into the egg mixture, whisking constantly until everything is well combined and smooth.
- Fold in Flour: Gently fold in the all-purpose flour with a spatula until just incorporated. Be careful not to overmix, as this can make the cakes tough.
- Fill Ramekins: Divide the batter evenly among the four prepared ramekins.
-
Oven Baking Option:
- Preheat Oven: Preheat your oven to 400°F (200°C).
- Bake Cakes: Place the filled ramekins on a baking sheet and bake for 12-15 minutes, or until the edges are set and firm, but the center still appears soft and jiggly when gently shaken. The cakes should have puffed up slightly.
- Cool Briefly: Carefully remove the cakes from the oven. Let them cool in the ramekins for 1-2 minutes before inverting.
-
Instant Pot Baking Option:
- Prepare Instant Pot: Pour 1 cup of water into the inner pot of your Instant Pot. Place the trivet inside.
- Cover Ramekins: Cover the top of each ramekin loosely with aluminum foil to prevent condensation from dripping onto the cakes.
- Place in Instant Pot: Carefully place the foil-covered ramekins on the trivet in the Instant Pot. You may need to stack them or cook in batches depending on your Instant Pot size.
- Pressure Cook: Secure the lid and set the sealing valve to “Sealing.” Select the “Pressure Cook” or “Manual” setting on HIGH pressure for 8-10 minutes.
- Release Pressure: Once cooking is complete, allow a Natural Pressure Release for 5 minutes, then carefully perform a Quick Release by turning the sealing valve to “Venting.”
- Cool Briefly: Carefully remove the ramekins from the Instant Pot using tongs. Remove the foil and let cool for 1-2 minutes.
- Serve: To serve, run a thin knife around the edge of each cake. Invert each ramekin onto a dessert plate. Garnish with a dusting of powdered sugar, fresh berries, or a scoop of vanilla ice cream, if desired. Serve immediately while warm.

Conclusion
You learned how to make rich lava cakes. We used simple steps and basic things.